

How to Use Winston AI for Text Analysis
Overview
Winston AI is a content analysis platform that lets you detect AI-generated text, check for plagiarism, get writing feedback, and fact-check claims — all from a single scan. This guide walks you through the complete flow, from starting a scan to reading your results, managing your documents, and understanding what each plan includes.
Step 1: Start a New Text Scan
Log in to your Winston AI account and click the New text scan button in the left sidebar. You will land on the scan editor — a two-panel layout with your text editor on the left and scan options on the right.
Before adding text, fill in two optional fields at the top:
- Document title — helps you find the scan later in your Projects list
- Document author — useful if you are checking student submissions or managing multiple writers
Step 2: Add Your Text
You have five ways to get content into the editor:
- Paste directly — click into the editor and paste your text (minimum 500 characters)
- File upload — upload a single .docx, .pdf, or .txt file
- Import from Google Drive — select a Google Doc, PDF, DOCX, or TXT file directly from your Google Drive
- Bulk upload — upload multiple documents at once
- Import from URL — enter a web address and Winston will pull the text from that page
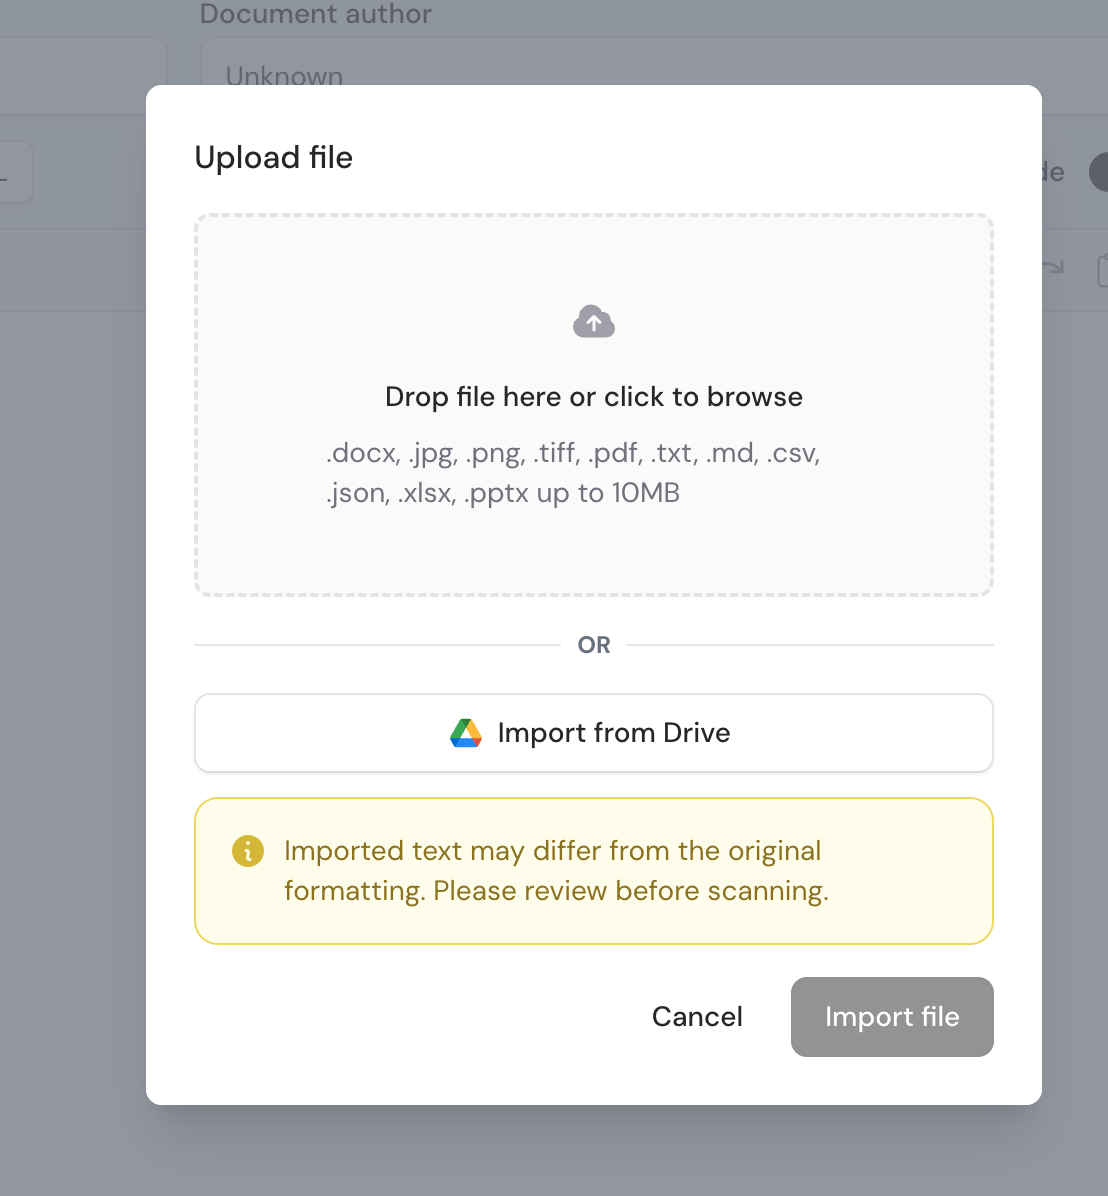
To import a file from Google Drive, click File upload, then select Import from Drive in the upload window. Choose your file and review the imported text before scanning, since its formatting may differ from the original document.
Bulk upload is useful when you need to scan several files in the same project. Click Bulk upload, then drag and drop your files into the upload window or click to browse and select files from your computer.
Bulk upload supports .docx, .pdf, .jpg, .png, and .tiff files, up to 10MB each, with a maximum of 50 files. Image files can be scanned with OCR so Winston can extract and analyze the text.
As you add text, the counter at the bottom updates in real time: words, characters, and the estimated credit cost for your chosen features.
Bulk Uploading Multiple Files
After you add files, Winston shows them in a list with the title, author, word count, and status. You can edit the document title or author before scanning, or remove a file from the list.
When the files are ready, click Next to choose which scan features to run.
Step 3: Select Your Scan Features
Below the editor, toggle any combination of five features on or off:
- AI detector (1 credit/word) — detects AI-generated content and gives a Human Score
- Plagiarism (2 credits/word) — checks for copied content across the web
- Fact checker (1 credit/word) — verifies factual claims against external sources
- Writing feedback (1 credit/word) — suggests grammar fixes, paraphrasing, and clarity improvements
- Essay grader (1 credit/word) — grades an essay against a selected rubric and provides an overall score, criteria-level feedback, and writing suggestions
The AI detector is enabled by default. The credit estimator updates immediately as you toggle features on and off. Not all features are available on every plan — see the plan comparison below.
For bulk uploads, the feature selection step appears inside the upload window. Choose the scan features you want to run across the uploaded files, then click Scan. Winston will show the total credits required before you start the scan.
Using Essay Grader
To use Essay Grader, select the Essay grader scan feature, then click Select rubric.
Winston opens a rubric selection window where you can choose from Default Rubrics or My Rubrics. You can search rubrics by name, filter them by language, and filter them by student level. Each rubric shows its language, student level, and number of criteria.
Select the rubric you want to use, then click Next.
Creating a Custom Rubric
If you want to use your own rubric, click Create in the rubric selection window.
Add a rubric name, choose the language and student level, then add your grading criteria. For each criterion, you can add marker guidance to explain what the AI should look for, then define the available grades and descriptions.
Click Create Rubric when your rubric is ready.
Essay Grader Settings
After selecting a rubric, you can add optional grading settings to help Winston grade more accurately:
- Class Name — the name of the class the essay is for
- Assignment Instructions — the original instructions given to the student
- Grading Instructions — any additional guidance for how the essay should be graded
You can also save these settings to the project. When everything is ready, click Confirm, then run the scan.
Step 4: Run the Scan
Click Scan. Winston processes your text and loads the results into the right panel. Credits for all selected features are deducted at this point.
After the scan is complete, Winston shows the results for each scan feature you selected, such as AI detection, plagiarism, readability, fact checking, writing feedback, or essay grading.
For bulk uploads, Winston displays a progress window after you click Scan. Each document shows its scan status while it is processing. You can leave this window open, or close it and let the scans continue in the background.
Reading Your Results
Once the scan finishes, the left panel shows a read-only version of your text with basic stats (word count, character count, sentence count, reading time). The right panel displays results in a tabbed layout — one tab per feature selected.
To edit the text after scanning, click the Edit mode toggle at the top of the left panel.
AI Detector Tab
Human Score — a percentage from 0% to 100%, with the model version used. A score near 0% means the content is almost certainly AI-generated; near 100% means it reads as human-written.
AI Prediction Map — a sentence-by-sentence breakdown with color coding:
- 0–20: AI Generated
- 20–40: Likely AI
- 40–60: Uncertain
- 60–80: Mostly Human
- 80–100: Human Written
The prediction map scans smaller portions individually, so it is less accurate than the overall Human Score. Use the overall score as your primary indicator.
Readability Score — a 0–100 score based on the Flesch-Kincaid formula, with a U.S. school grade level label. You can also check the readability score of any text using Winston's standalone readability checker.
Sections Driving AI Score — a list of individual sentences with percentage scores, useful for identifying which sections are pulling the overall score down.
Explain (AI Overview)
Click the Explain button above the text panel to open the AI Overview panel. This generates a plain-language narrative that explains what the detection results mean — it summarizes the verdict, interprets the sentence-level scores, and if the content is flagged as AI-generated, offers suggestions for making the writing sound more human. Useful when sharing results with students or clients who need context beyond a raw percentage.
Fact Checker Tab
The fact checker extracts factual claims from your text and checks them against external sources. Each statement is classified as:
- Supported — backed by credible sources
- Unsure — could not be definitively verified
- Refuted — contradicts available evidence
Click any statement to expand it and view the explanation and source links.
Writing Feedback Tab
Writing feedback is broken into three categories:
- Grammar — errors with a one-click Correct button
- Paraphrase — rephrasing suggestions with a one-click Correct button
- Clarity — structural guidance that requires manual revision
Plagiarism Tab
Shows an overall plagiarism percentage and a list of matched sources. Each match highlights the relevant text in the left panel. A result of 0% with zero matches means no plagiarism was detected.
Essay Grader Tab
When the essay grader scan is complete, Winston shows an Essay Grader tab. This includes the selected rubric, the overall score, and an overall review of the essay.
Below that, the Criteria Breakdown shows each rubric criterion with its score and feedback. Some criteria may include Suggestions. Click the yellow suggestions to highlight the related text in the original document, so you can see exactly where the feedback applies.
Managing Your Document and Project
Actions Menu
The Actions button (next to Download and Share) has three options:
- New document — adds a new document to the current project
- Save document — manually saves the current state
- Delete project — permanently removes the project and all documents in it
Renaming a Project
Click the project title at the top of the page (shown as "Untitled - YYYY-MM-DD" by default) to rename it inline.
Navigating Between Documents
Use the Previous document and Next document arrows to move between documents in the same project. The list icon in the top-right area opens Project documents, where you can see all documents in the current project and their scan status. When a project has more than one document, the list icon shows a badge with the document count.
Viewing Bulk Upload Progress
When you close the bulk upload progress window, the scans continue in the background. Click the list icon in the top-right area to open Project documents and see every document in the project, including each document’s scan progress and available actions.
Once a document finishes scanning, click the eye icon to open and review its results.
Downloading and Sharing Results
Download — exports a PDF report. Choose which sections to include (AI detector, Plagiarism, Writing feedback, Fact checker), or a separate Essay Grader report. All sections are selected by default.
Share — toggle on Link sharing to generate a shareable URL. Recipients get read-only access to your scan results. Link sharing is off by default.
Rescanning
The Rescan button at the bottom of any results tab lets you re-run the scan after editing — useful for checking whether revisions improved the score. Credits are deducted again.
Viewing Past Scans
All scans are saved automatically and accessible from:
- Documents in the left sidebar — your most recent documents
- Projects in the left sidebar — full list of all projects, sorted by date
On the Projects page you can sort projects, create a new one with the New project card, and delete projects using the delete button on each card.
Bonus Tools
Two additional tools are available under More in the left sidebar (under Tools):
Grammar Checker — a standalone grammar, spelling, and style checker. Available in English (American, Canadian, British, and Australian). No credits required.
Text Compare — paste two versions of a text side by side and click Compare texts to highlight differences and get a similarity score. Cost: 1/4 credit per word, minimum 100 characters per box.
What's Available on Each Plan
Not all features are available on every plan:
| Feature | Free Trial | Essential AI | Essential Plagiarism (discontinued) | Advanced | Elite |
|---|---|---|---|---|---|
| AI detector | Yes | Yes | No | Yes | Yes |
| Plagiarism checker | No | No | Yes | Yes | Yes |
| Writing feedback | No | Yes | Yes | Yes | Yes |
| Fact checker | No | Yes | Yes | Yes | Yes |
| Essay grader | No | Yes | Yes | Yes | Yes |
| AI Overview (Explain) | No | Yes | Yes | Yes | Yes |
| Image scan | Yes | Yes | No | Yes | Yes |
| Website scan | Yes | Yes | Yes | Yes | Yes |
| Google Classroom | No | Yes | Yes | Yes | Yes |
| HUMN-1 certification | Yes | No | No | Yes | Yes |
| HUMN-2 certification | No | No | No | No | Yes |
| Shareable reports | No | Yes | Yes | Yes | Yes |
| Credit top-up | No | No | No | No | Yes |
| Team members | 0 | 0 | 0 | 5 | Unlimited |
| Monitored websites | 0 | 0 | 0 | 1 | 1 |
Choosing Between Essential AI and Essential Plagiarism
The Essential AI plan and the Essential Plagiarism (discontinued) plan are not interchangeable — they were designed for different use cases. Essential AI focuses on AI detection; the Essential Plagiarism (discontinued) plan replaces AI detection with plagiarism checking. If you need both, you will need to upgrade to Advanced or Elite.
Credit Top-Ups (Elite Only)
On Essential AI, the Essential Plagiarism (discontinued) plan, and Advanced plans, once your monthly credits are used up, you wait until the next billing cycle. Elite plan users can purchase additional credits at any time using the Get more credits link in the top navigation bar — no waiting required.